


If the crimped ferrule comes off or if you notice any wiggling, repeat the last two steps. Otherwise, your wire is properly crimped and ready to make a quality electrical connection.
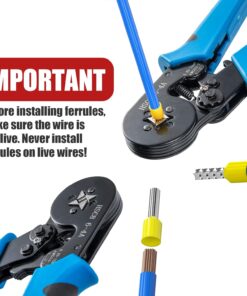
IMPORTANT: Before you start installing ferrules, make sure the wire is not live. You should never install ferrules on live wires!
How to Crimp Ferrule?
STEP 1
Identify the size of wire you want to crimp. The size of the wire will help determine what size of ferrule you need. Typically, a ferrule should be the same size as the wire.
STEP 2
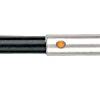
Insert the stripped wire end into the ferrule terminal. Make sure the tip of the wire touches the bottom of the tube. If the stripped section is shorter, remove more insulation from the wire with a wire stripper. If the section is longer, cut it to length with a pair of diagonal pliers or ordinary wire cutters.
STEP 3
Crimp the ferrule assembly with your crimping tool. Simply insert the ferrule terminal assembly inside the jaw of the crimping tool and squeeze the handles firmly to crimp. Squeeze them all the way to tightly secure the wire into the ferrule connector.
STEP 4
Test the quality of the crimp. Do a pull or tug test on the crimp to make sure it is tight and will not come off. Pull the crimped part and the rest of the wire in opposite directions.
Ferrule Crimping Tool Kit
Crimp Jaws
AWG 23
Be the first to review “Luney Ferrule Crimping Tool Kit, LUNEY Wire Ferrule Kit with 1250PCS Wire End Ferrules”
Related products


Reviews
There are no reviews yet.